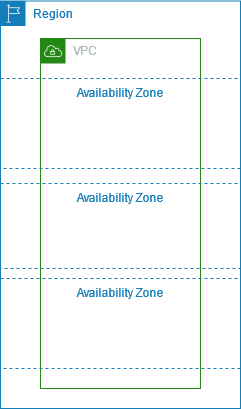
Amazon Web Services (AWS) subnets are logical subdivisions of a virtual private cloud (VPC) that allow you to partition and organize your resources within a VPC. Each subnet has its own unique IP address range and can be associated with a different availability zone (AZ) within a region.
Subnets allow you to isolate and control access to resources within your VPC. For example, you can create a public subnet for resources that need to be accessible from the internet, such as web servers, and a private subnet for resources that should not be directly accessible, such as database servers.
In addition, subnets can be used to enable advanced networking features in AWS, such as routing traffic between subnets, setting up network access control lists (ACLs) to restrict traffic, and creating VPN connections between on-premises data centers and AWS VPCs.
AWS subnets are an essential component of building scalable, highly available, and fault-tolerant applications in the cloud.
What is Subnet?
A subnet is a logical subdivision of an IP network that allows the network to be partitioned into smaller, more manageable networks. It is used to control and organize network traffic and improve network security.
A subnet mask is a 32-bit number that is used to identify the network and the host portion of an IP address. It is used to determine which bits of an IP address are used for the network portion and which bits are used for the host portion.
CIDR notation, or Classless Inter-Domain Routing notation, is a way of expressing the size of a subnet and the number of hosts that can be accommodated within it. It is expressed as a slash followed by a number, indicating the number of bits used for the network portion of the IP address. For example, a subnet with a CIDR notation of /24 has 24 bits reserved for the network portion and 8 bits reserved for the host portion, allowing for a total of 256 hosts within the subnet.
Before moving to the next topics let’s test your skills on AWS Subnets.
1. What is an AWS subnet?
A. A physical server in an AWS data center.
B. A logical subdivision of a virtual private cloud.
C. A network security protocol used by AWS.
D. An AWS service for managing domain names.
2. How are AWS subnets identified within a VPC?
A. By a name assigned by the user.
B. By a randomly generated identifier.
C. By an IP address range assigned by the user.
D. By an availability zone assigned by AWS.
3. What is the purpose of creating multiple subnets within a VPC?
A. To improve network performance.
B. To increase security.
C. To organize and manage resources.
D. All of the above.
4. Which of the following networking features can be enabled using AWS subnets?
A. Traffic routing between subnets.
B. Network access control lists (ACLs).
C. VPN connections between on-premises data centers and AWS VPCs.
D. All of the above.
5. What type of resources might be placed in a public subnet?
A. Database servers.
B. Application servers.
C. Web servers.
D. None of the above.
6. Can a resource be placed in more than one subnet within a VPC?
A. Yes.
B. No.
7. What is the purpose of an AWS route table?
A. To define the IP address range for a subnet.
B. To define the routing rules for a VPC.
C. To define the security groups for a subnet.
D. To define the availability zone for a VPC.
Answers:
1: B
2: D
3: D
4: D
5: C
6: B
7: B
Basics of AWS Subnets and VPC

A subnet in AWS works similarly to a traditional subnet, where it is used to segment an IP network. In AWS, subnets are used to partition a virtual private cloud (VPC) into smaller subnetworks that can be used to launch and manage resources such as instances, containers, and databases.
Each subnet in an AWS VPC has a unique IP address range, and resources within the same subnet can communicate with each other directly. Additionally, subnets are associated with a routing table, which is used to route traffic between subnets or to the internet.
In AWS, subnets are associated with a VPC. A VPC is a virtual network that is logically isolated from other AWS resources, allowing users to create and manage their own virtual network in the cloud. When a subnet is created within a VPC, it is automatically associated with the VPC’s default route table.
However, additional route tables can be created and associated with specific subnets to allow for more granular control over network traffic. Additionally, subnets can be associated with network access control lists (ACLs) and security groups, which are used to control inbound and outbound traffic to and from resources within the subnet.
A virtual private cloud (VPC) refers to a virtual network dedicated to your AWS account. This logically isolates you from other virtual networks in the AWS Cloud. Moreover, it has the ability for launching AWS resources like Amazon EC2 instances, into your VPC.
While creating a VPC, you must specify a range of IPv4 addresses for the VPC in the form of a Classless Inter-Domain Routing (CIDR) block. For example, 10.0.0.0/16, is the primary CIDR block for your VPC.
New VPC with an IPv4 CIDR block:
The main route table consists of the following routes.
Destination
10.0.0.0/16
Target
local
Nevertheless, you have the choice to include one or more subnets in each Availability Zone after constructing a VPC. Subnets in a Local Zone, a deployment of Amazon infrastructure used to bring computing, storage, databases, and other chosen services closer to your end customers, are optionally addable here.
Also, you define the subnet’s CIDR block, which is a subset of the VPC CIDR block, when you construct a subnet. There, each subnet cannot traverse zones and must remain wholly within one Availability Zone. Different sites created to be isolated from failures in other Availability Zones are referred to as Availability Zones. This gives each subnet a special ID.
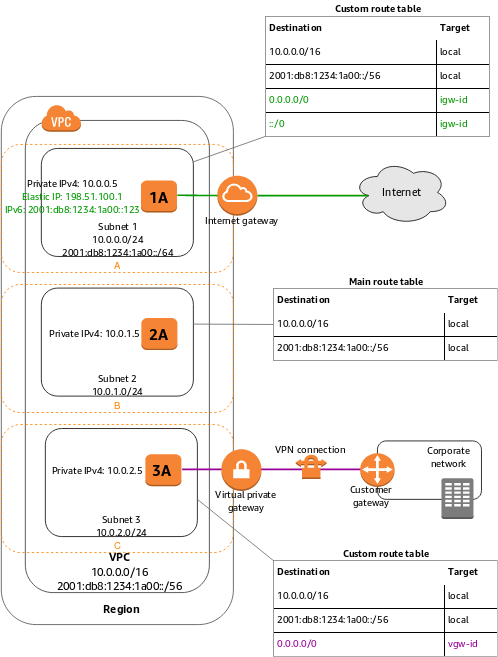
The diagram below displays the VPC configuration with subnets in multiple Availability Zones.
- Firstly, 1A, 2A, and 3A are instances in your VPC.
- Secondly, the IPv6 CIDR block is linked with the VPC, and an IPv6 CIDR block is linked with subnet 1.
- Lastly, an internet gateway enables communication over the internet, and a virtual private network (VPN) connection enables communication with your corporate network.

However, if a subnet’s traffic is routed to an internet gateway, then, the subnet is called a public subnet. In the above diagram, subnet 1 is a public subnet. And, if a subnet doesn’t have a route to the internet gateway, then, the subnet is known as a private subnet. In the above diagram, subnet 2 is a private subnet.
Sizing of AWS Subnet and VPC
Amazon VPC supports IPv4 and IPv6 addressing with having different CIDR block size quotas for each. However, by default, all VPCs and subnets must have IPv4 CIDR blocks that mean you can’t change this behavior. But, optionally, you can associate an IPv6 CIDR block with your VPC.
1. VPC and subnet sizing for IPv4
While creating a VPC, you must specify an IPv4 CIDR block for the VPC. The allowed block size is between a /16 netmask and /28 netmask. After creating VPC, you can associate secondary CIDR blocks with the VPC.

However, the CIDR block of a subnet can be the same as the CIDR block for the VPC or a subset of the CIDR block for the VPC. The allowed block size is between a /28 netmask and /16 netmask. And, if you create more than one subnet in a VPC, then, the CIDR blocks of the subnets cannot overlap.
For example, creating a VPC with CIDR block 10.0.0.0/24 supports 256 IP addresses. Moreover, you can break this CIDR block into two subnets, each supporting 128 IP addresses.
- Firstly, one subnet uses CIDR block 10.0.0.0/25
- Secondly, the other uses CIDR block 10.0.0.128/25
However, the first four IP addresses and the last IP address in each subnet CIDR block are not available for you to use, And, they cannot be assigned to an instance. For example, in a subnet with CIDR block 10.0.0.0/24, the five IP addresses below are reserved:
- Firstly, 10.0.0.0: Network address.
- Secondly, 10.0.0.1: Reserved by AWS for the VPC router.
- Thirdly, 10.0.0.2: Reserved by AWS. The IP address of the DNS server is the base of the VPC network range plus two.
- Then, 10.0.0.3: Reserved by AWS for future use.
- Lastly, 10.0.0.255: Network broadcast address. As there is no support for broadcast in a VPC.
2. VPC and subnet sizing for IPv6
You have the option to link a single IPv6 CIDR block with an existing VPC in your account, or while creating a new VPC. The CIDR block is a fixed prefix length of /56. Moreover, you can request an IPv6 CIDR block from Amazon’s pool of IPv6 addresses.
However, if you’ve linked an IPv6 CIDR block with your VPC, then, you can link an IPv6 CIDR block with an existing subnet in your VPC, or while you creating a new subnet. Here, a subnet’s IPv6 CIDR block is a fixed prefix length of /64.
For example, create a VPC and specify that you want to link an Amazon-provided IPv6 CIDR block with the VPC. Then, Amazon assigns the following IPv6 CIDR block to your VPC: 2001:db8:1234:1a00::/56. However, you cannot choose the range of IP addresses yourself. But, you can create a subnet and link an IPv6 CIDR block from this range.
Further, you can disassociate an IPv6 CIDR block from a subnet, and you can disassociate an IPv6 CIDR block from a VPC. After disassociating an IPv6 CIDR block from a VPC, you cannot expect to receive the same CIDR if you link an IPv6 CIDR block with your VPC again later.
You must remember, that the first four IPv6 addresses and the last IPv6 address in each subnet CIDR block are not available for you to use, and cannot be assigned to an instance. For example, in a subnet with CIDR block 2001:db8:1234:1a00/64, the five IP addresses mentioned are reserved:
- Firstly, 2001:db8:1234:1a00::
- Secondly, 2001:db8:1234:1a00::1
- Thirdly, 2001:db8:1234:1a00::2
- Then, 2001:db8:1234:1a00::3
- Lastly, 2001:db8:1234:1a00:ffff:ffff:ffff:ffff
Moving on, now, we will learn about the routing and security functionalities of the AWS Subnet.
AWS Subnets routing
Every subnet must be linked with a routing table for specifying the allowed routes for outbound traffic leaving the subnet. However, every subnet created automatically gets associated with the main route table for the VPC.
- Firstly, in the diagram, the route table linked with subnet 1 routes all IPv4 traffic (0.0.0.0/0) and IPv6 traffic (::/0) to an internet gateway. This is because instance 1A has an IPv4 Elastic IP address and an IPv6 address, it can be reached from the internet over both IPv4 and IPv6.
- Secondly, instance 2A can’t reach the internet but can reach other instances in the VPC. However, you can allow an instance in your VPC for initiating outbound connections to the internet over IPv4 but prevent unsolicited inbound connections from the internet using a network address translation (NAT) gateway or instance.
- Lastly, the route table linked with subnet 3 routes all IPv4 traffic (0.0.0.0/0) to a virtual private gateway. And, Instance 3A can reach computers in the corporate network over the Site-to-Site VPN connection.
AWS Subnets security
AWS provides two features for increasing security in your VPC
1. Security groups
These control inbound and outbound traffic for your instances
2. Network ACLs
These control inbound and outbound traffic for your subnets.
However, by design, each subnet must be linked with a network ACL. That is to say, every subnet that you create is automatically linked with the VPC’s default network ACL. And, you can change the association and the contents of the default network ACL.
Further, you can create a flow log on your VPC or subnet for capturing the traffic that flows to and from the network interfaces in your VPC or subnet. You can also design a flow log on an individual network interface. Flow logs publish on CloudWatch Logs or Amazon S3.
Now, we have understood the basics of Subnets and VPC. In the next section, we will learn the working process of AWS Subnets and VPC.
Working with VPCs and Subnets
In this, we will learning about the working of subnets.
1. Creating a subnet in your VPC
For adding a new subnet to your VPC, specify an IPv4 CIDR block for the subnet from the range of your VPC. Moreover, you can specify the Availability Zone in which you want the subnet to stay. And, you can have access to multiple subnets within the same Availability Zone.
However, for creating the subnet in a Local Zone, or a Wavelength Zone, you must enable the Zone.
For adding a subnet to your VPC using the console:
- Firstly, open the Amazon VPC console.
- Secondly, choose Subnets in the navigation pane. Then, select Create subnet.
- Thirdly, specify the subnet details and choose to Create.
- Name tag. You must provide a name for your subnet.
- VPC. Select the VPC for which you’re creating the subnet.
- Availability Zone. Select a Zone in which your subnet will stay. Or you can leave the default No Preference.
- IPv4 CIDR block. Define an IPv4 CIDR block for your subnet.
After creating a subnet, you can do the following:
- Firstly, configuring your routing. For making your subnet a public subnet, you must attach an internet gateway to your VPC.
- Secondly, modifying the subnet settings for specifying that all instances launched in that subnet receive a public IPv4 address, or an IPv6 address, or both.
- Thirdly, creating or modifying your security groups as required.
- Then, creating or modifying your network ACLs as required.
- Lastly, sharing the subnet with other accounts.
2. Viewing your subnet
For viewing subnet details using the console:
- Firstly, open the Amazon VPC console.
- Secondly, choose Subnets in the navigation pane.
- Thirdly, select the subnet. Then choose View Details.
3. Associating an IPv6 CIDR block with your subnet
You can link an IPv6 CIDR block with an existing subnet in your VPC. But, make sure that the subnet must not have an existing IPv6 CIDR block linked with it.
For associating an IPv6 CIDR block with a subnet using the console:
- Firstly, open the Amazon VPC console.
- Secondly, choose Subnets in the navigation pane.
- Thirdly, select your subnet. Then, choose Subnet Actions and Edit IPv6 CIDRs.
- After that, choose Add IPv6 CIDR. Here you have to specify the hexadecimal pair for the subnet and then, confirm the entry by choosing the tick icon.
- Lastly, choose Close.
4. Launching an instance into your subnet
After creating your subnet and configuring your routing, you can launch an instance into your subnet using the Amazon EC2 console.
For launching an instance into your subnet using the console:
- Firstly, open the Amazon EC2 console.
- Secondly, choose Launch Instance on the dashboard.
- Thirdly, follow the directions in the wizard. Then, select an AMI and an instance type and choose Next: Configure Instance Details.
- Now, ensure that you have selected the required VPC in the Network list on the Configure Instance Details page. Then, select the subnet into which to launch the instance. After that, keeping the other default settings on this page and select Next: Add Storage.
- Then, you can configure storage for your instance On the next pages of the wizard, and add tags. After that, choose from any existing security group that you own on the Configure Security Group page. Or you can follow the wizard directions for creating a new security group. Now, Select Review and Launch when you’re done.
- Next, review your settings and select Launch.
- Lastly, select an existing key pair that you own or create a new one. And then, after completing select Launch Instances.
5. Deleting your subnet
You delete the subnet if you no longer need it. However, you must terminate any instances in the subnet first.
For deleting your subnet using the console:
- Firstly, open the Amazon EC2 console.
- Secondly, terminate all instances in the subnet.
- Thirdly, open the Amazon VPC console.
- Then, choose Subnets in the navigation pane.
- After that, select the subnet for deleting. And, then, choose Actions, Delete subnet.
- Lastly, select delete subnet in the Delete Subnet dialog box.
6. Disassociating an IPv6 CIDR block from your VPC or subnets
If you want to continue using your VPC or subnet for creating and communicating with IPv4 resources but do not want the IPv6 support then, you can disassociate the IPv6 CIDR block.
For disassociating an IPv6 CIDR block, first, unassign any IPv6 addresses that are assigned to any instances in your subnet.
For disassociating an IPv6 CIDR block from a subnet using the console:
- Firstly, open the Amazon VPC console.
- Secondly, choose Subnets in the navigation pane.
- Thirdly, select your subnet, then, choose Actions, Edit IPv6 CIDRs.
- After that, remove the IPv6 CIDR block for the subnet by choosing the cross icon.
- Lastly, select Close.

Final Words
Use the above information to understand the process of AWS Subnets and how it is associated with the VPC. Learn about the various functions areas of subnets and the working linked with Amazon VPC. Getting started with the AWS Subnets will enhance your knowledge and skill level. Take help from AWS documentation and start your journey with the subnets.


