Azure Virtual Network service is used for creating controllable hybrid infrastructure, IP addresses, and DNS servers. Microsoft Azure Virtual Network service provides a secure environment for your connections using an IPsec VPN or ExpressRoute as well as a granular control across traffic between subnets. Moreover, it builds sophisticated network topologies using virtual appliances and offers an isolated and highly secure environment for applications. This makes Azure Virtual Networks services to be used globally for providing beneficial solutions to many top companies and organizations.
However, in this blog, we will learn how to create and manage Virtual Networks. But, before proceeding, let’s take a quick overview of Azure Virtual Network.
What is Azure Virtual Network?
Azure Virtual Network (VNet) can be considered as a basic building block for your private network in Azure. VNet provides access to several types of Azure resources like Azure Virtual Machines (VM) for securely communicating with each other, the internet, and on-premises networks. However, this is the same as the traditional network that can be operated in its own data center but it has additional benefits of Azure’s infrastructure like scale, availability, and isolation.

Further, talking about Azure Virtual Network features, this includes:
1. Enhancing security and isolation
Azure Virtual Network provides a remote and highly secure environment for running virtual machines and applications. Virtual Network helps in treating Azure in the same way as you would treat your own datacenter.
2. Relying on our global reach
In Virtual Network, traffic between Azure resources in a single region or in multiple regions remains in the Azure network. In Azure, traffic for the virtual machine-to-virtual machine, storage, and SQL communication only traverses the Azure network. And, inter-region virtual network-to-virtual network traffic also flows entirely across the Azure network.
3. Build sophisticated network topologies
In a virtual network, you can run your favorite network virtual appliances like WAN optimizers, load balancers, and application firewalls. Moreover, you can specify traffic flows, thus enabling you for designing your network with a greater degree of control.
4. Extend your datacenter into the cloud
Virtual Network helps in expanding the on-premises IT environment into the cloud you set up and connect to a remote branch office. This provides options for securely connecting to a virtual network in which you select an IPsec VPN or a private connection by using Azure ExpressRoute.
5. Create hybrid applications
Virtual Network helps in creating your hybrid cloud applications that securely connect to your on-premises datacenter so an Azure web application can access an on-premises SQL Server database. Moreover, it can authenticate customers against an on-premises Azure Active Directory service.
6. IaaS and PaaS, better together
Virtual Network helps in creating services that rely on Azure cloud services and Azure Virtual Machines. In Azure Virtual Network, you can utilize Azure web roles for your front end and virtual machines for backend databases. Moreover, you can integrate platform as a service (PaaS) and infrastructure as a service (IaaS) in a virtual network for getting more flexibility and scalability while creating apps.
Above we have discussed the basic overview of Azure Virtual Network. In the next section, we will learn how to manage virtual in Azure.
Getting started with Azure Virtual Networks
1. Creating a Virtual Network: Azure portal
In this, we will learn how to create a virtual network using the Azure portal. Here, we will deploy two virtual machines (VMs) and then, securely communicate between VMs and connect to VMs from the internet.
1. Creating a virtual network
- Firstly, in the upper left-hand corner of the portal select Create a resource.
- Secondly, enter Virtual Network in the search box. Then, in the search results select Virtual Network.
- Thirdly, select Create on the Virtual Network page.
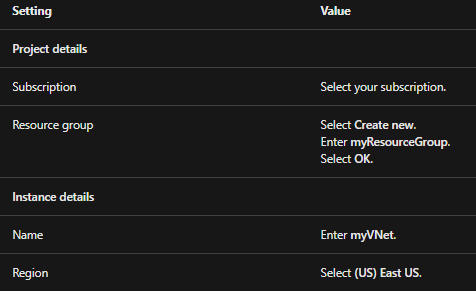
- Fourthly, enter or select this information in the Basics tab in Create virtual network:
- Then, at the bottom of the page select the IP Addresses tab, or select the Next: IP Addresses button.
- After that, select the existing address space in IPv4 address space and change it to 10.1.0.0/16.
- Next, select + Add subnet, then enter MySubnet for Subnet name and 10.1.0.0/24 for the Subnet address range.
- Now, select Add.
- After that, at the bottom of the page select the Security tab, or select the Next: Security button.
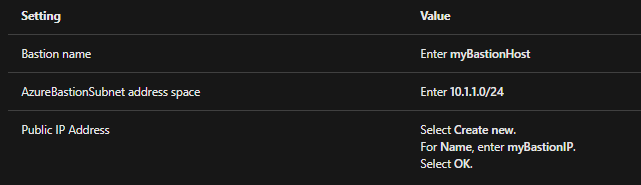
- Then, select Enable under BastionHost. And, enter this information:
- After that, select the Review + create tab or select the Review + create button.
- Lastly, select Create.
2. Creating virtual machines
We will create two VMs in the virtual network:
Creating the first VM
- Firstly, select Create a resource > Compute > Virtual machine on the upper-left side of the portal.
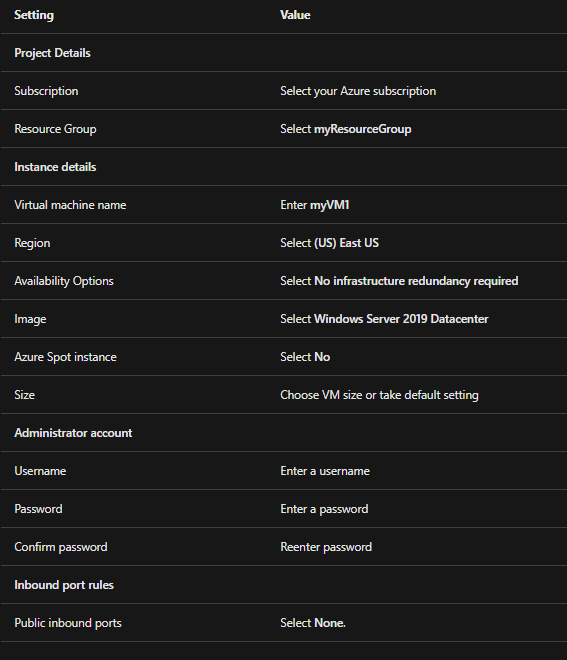
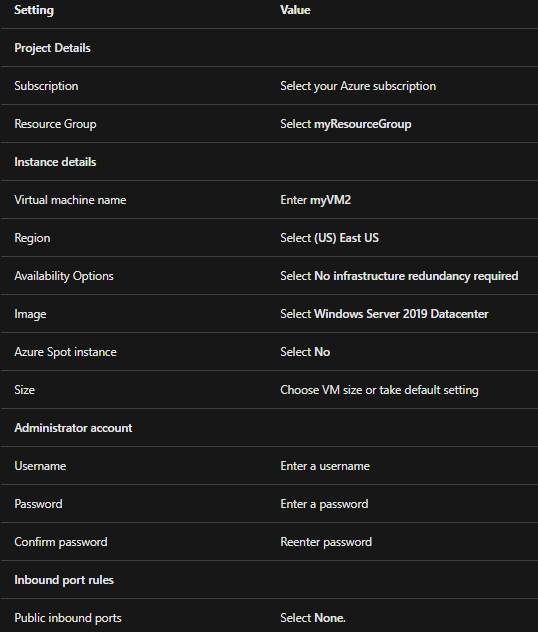
- Secondly, type or select the values in the Basics tab in Create a virtual machine:
- Thirdly, select the Networking tab, or select Next: Disks. Then, click on next: Networking.
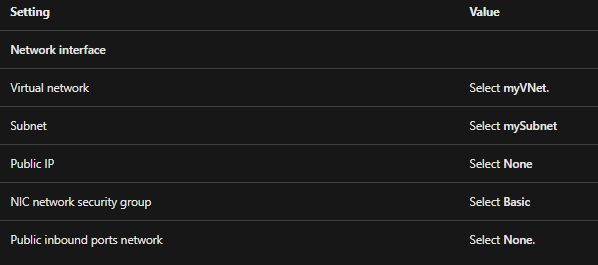
- After that, in the Networking tab, enter:
- Then, select the Review + create tab, or select the blue Review + create button at the bottom of the page.
- Lastly, review the settings, and then select Create.
Creating the second VM
- Firstly, select Create a resource > Compute > Virtual machine on the upper-left side of the portal.
- Secondly, type or select the values in the Basics tab in Create a virtual machine:
- Thirdly, select the Networking tab, or select Next: Disks. Then, click on next: Networking.
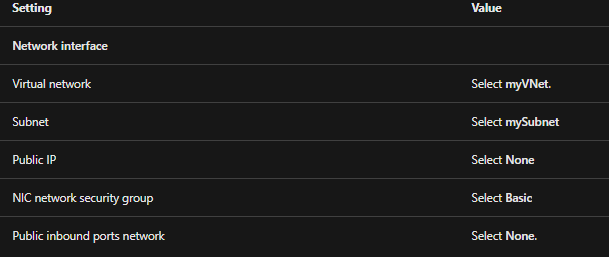
- Then, in the Networking tab, select or enter:
- After that, select the Review + create tab, or select the blue Review + create button at the bottom of the page.
- Lastly, review the settings, and then select Create.

3. Connecting to myVM1
- Firstly, open the Azure portal for managing your private VM. Then, look for and select Virtual machines.
- Secondly, select the name of your private virtual machine myVM1.
- Thirdly, select Connect in the VM menu bar, then select Bastion.
- Then, select the blue Use Bastion button on the Connect page.
- After that, on the Bastion page, enter the username and password you created for the virtual machine previously.
- Lastly, select Connect.
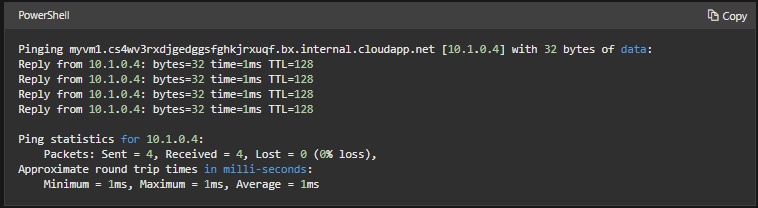
4. Communicating between VMs
- Firstly, open PowerShell in the bastion connection of myVM1.
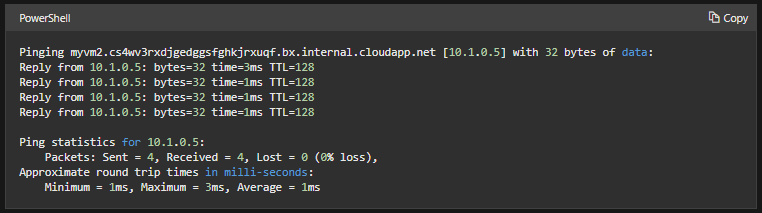
- Secondly, enter ping myvm2.
- Here, you will get a message similar to this output:
- Thirdly, close the bastion connection to myVM1.
- Then, complete the steps in Connect to myVM1, but connect to myVM2.
- After that, enter ping myvm1 in PowerShell on myVM2.
- Here, you will get something like this message:
- Lastly, close the bastion connection to myVM2.
2. Viewing virtual networks and settings
- Firstly, enter the virtual networks in the search box at the top of the portal. Then, select the Virtual networks from the search results.
- Secondly, select the virtual network from the list of virtual networks that you want to view settings for.
- However, the following settings are listed for the virtual network you selected:
- Overview:
- This provides information related to the virtual network, including address space and DNS servers.
- Address space:
- The address spaces that are allocated to the virtual network are listed.
- Connected devices:
- This provides the list of any resources that are connected to the virtual network. There are three network interfaces and one load balancer that are connected to the virtual network. Moreover, this also provides the list of any new resources that you create and connect to the virtual network. And, the resource will not appear on the list if you delete a resource that was connected to the virtual network.
- Subnets:
- A list of subnets that exist inside the virtual network is shown.
- DNS servers:
- You can define whether the Azure internal DNS server or a custom DNS server provides name resolution for devices that are connected to the virtual network. However, while creating a virtual network by using the Azure portal, bu deafult, Azure’s DNS servers are used for name resolution inside a virtual network.
- Peerings:
- This provides list of existing peerings in the subscription. Moreover, here, you can view settings for existing peerings, or create, change, or delete peerings.
- Properties:
- This shows the virtual network settings including the virtual network’s resource ID and the Azure subscription.
- Diagram:
- This provides a visual representation of all devices that are connected to the virtual network. Moreover, the diagram has some key information related to the devices. Further, for managing a device in this view, in the diagram, select the device.
- Overview:
3. Adding or removing an address range
An address range cannot overlap with other address ranges inside the same virtual network and it must be defined in CIDR notation. However, the address ranges you specify can be public or private (RFC 1918) and is reachable only from within the virtual network, from interconnected virtual networks, and from any on-premises networks connected to the virtual network.
Further, you can decrease the address range for a virtual network only if it includes the ranges of any associated subnets. In addition, you can expand the address range, for example, changing a /16 to /8. However, you cannot add the following address ranges:
- 224.0.0.0/4 (Multicast)
- 255.255.255.255/32 (Broadcast)
- 127.0.0.0/8 (Loopback)
- 169.254.0.0/16 (Link-local)
- 168.63.129.16/32 (Internal DNS, DHCP, and Azure Load Balancer health probe)
For adding or removing an address range:
- Firstly, enter the virtual networks in the search box at the top of the portal. Then, select Virtual networks from the search results.
- Secondly, select the virtual network for which you want to add or remove an address range from the list of virtual networks.
- Thirdly, under SETTINGS select Address space.
- Then, complete one of the following options:
- Adding an address range: Here, enter the new address range. You must remember that the address range cannot overlap with an existing address range that is specified for the virtual network.
- Removing an address range: On the right of the address range, you want to remove, select …, then select Remove. However, if a subnet exists in the address range, you cannot remove the address range. For removing an address range, first, delete any subnets that exist in the address range.
- Lastly, select Save.
4. Changing DNS servers
All VMs that are connected to the virtual network register with the DNS servers defined for the virtual network. They also use the defined DNS server for name resolution. However, every network interface (NIC) in a VM can have its own DNS server settings. And, if a NIC has its own DNS server settings, they overrule the DNS server settings for the virtual network.
For adding, changing, or removing a DNS server:
- Firstly, enter the virtual networks in the search box at the top of the portal. Then, select Virtual networks from the search results.
- Secondly, select the virtual network from the list of virtual networks for which you want to change DNS servers for.
- Thirdly, under SETTINGS select DNS servers.
- Then, select one of the following options:
- Default (Azure-provided):
- There is atuomatic registration of all resource names and private IP addresses to the Azure DNS servers. You can resolve names between any resources that are connected to the same virtual network by using a custom DNS server.
- Custom:
- You can add one or more servers depdnding on the Azure limit for a virtual network.
- Add an address:
- Add the server to your virtual network DNS servers list. And, using this you can also registers the DNS server with Azure.
- Remove an address:
- Deleting the server removes the server only from this virtual network list. The DNS server stays registered in Azure for your other virtual networks to use.
- Reorder DNS server addresses:
- DNS server lists are used in the order that they are defined. However, if the first DNS server in the list can be reached, the client uses that DNS server, regardless of whether the DNS server is functioning properly.
- Change an address
- Highlight the DNS server in the list, and then enter the new address.
- Default (Azure-provided):
- Then, select Save.
- Lastly, restart the VMs that are connected to the virtual network, so they are allocated the new DNS server settings. And, VMs use their present DNS settings until they are restarted.
5. Deleting a virtual network
Virtual Networks can only be deleted only if there are no resources connected to them. However, if there are resources connected to any subnet inside, then first delete the resources that are connected to all subnets inside the virtual network. These steps for deleting a resource differ depending on the resource. Further, for deleting a virtual network:
- Firstly, enter the virtual networks in the search box at the top of the portal. Then, select Virtual networks from the search results.
- Secondly, select the virtual network you want to delete from the list of virtual networks.
- Thirdly, make sure that there are no devices connected to the virtual network by selecting Connected devices, under SETTINGS. And, if there are connected devices, first, delete them before you can delete the virtual network. Then, select Overview.
- After that, select Delete.
- Lastly, for confirming the deletion of the virtual network, select Yes.
Final Words
Above we have understood the process of Azure Virtual Networks by covering its basics and understanding the process for managing virtual networks. However, Azure Virtual Networks is widely used by top companies for providing solutions over the network. So, if you have an interest in getting knowledge about virtual networks then, go through the above information and start learning using Microsoft Documentation.
