Perform restore of user database backup
In this we will learn how to restore a full database backup using SQL Server Management Studio.
However, before you can restore a database under the full or bulk-logged recovery model, you may need to back up the active transaction log. In other words, too restore an encrypted database, you need access to the certificate or asymmetric key used to encrypt that database. Without the certificate or asymmetric key, you cannot restore that database. So, you must retain the certificate used to encrypt the database encryption key for as long as you need to save the backup.
Further, if you restore an older version database to SQL Server 2019 (15.x), that database will automatically upgrade to SQL Server 2019 (15.x). This precludes the database from being used with an older version of the Database Engine. However, this relates to metadata upgrade and does not affect the database compatibility level. However, if the compatibility level of a user database is 100 or higher before upgrade, it remains the same after upgrade. And, if the compatibility level is 90 before upgrade, in the upgraded database. Then, the compatibility level is set to 100, which is the lowest supported compatibility level in SQL Server 2019 (15.x).
Examples
A. Restore a full database backup
- Firstly, in Object Explorer, connect to an instance of the SQL Server Database Engine and then expand that instance.
- Secondly, right-click Databases and select Restore Database…
- Thirdly, on the General page, use the Source section to specify the source and location of the backup sets to restore. Select one of the following options:
- Database. Select the database to restore from the drop-down list. The list contains only databases that have been backed up according to the msdb backup history.
- Device. Click the browse (…) button to open the Select backup devices dialog box.
- Then, select backup devices dialog box
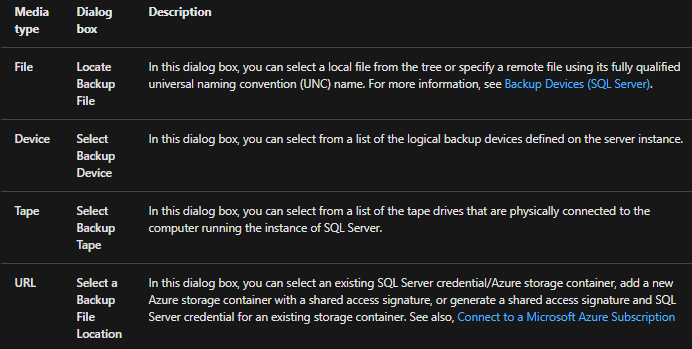
- Backup media type. Select a media type from the Backup media type drop-down list.
- Add. Depending on the type of media you select from the Backup media type drop-down list, clicking Add opens one of the following dialog boxes.
- Then, select backup devices dialog box
- Next, in the Destination section, the Database box is automatically populated with the name of the database to be restored. To change the name of the database, enter the new name in the Database box.
- After that, in the Restore to box, leave the default as To the last backup taken or click on Timeline to access the Backup Timeline dialog box to manually select a point in time to stop the recovery action.
- Then, in the Backup sets to restore grid, select the backups to restore. This grid displays the backups available for the specified location.
By default, a recovery plan is suggested. To override the suggested recovery plan, you can change the selections in the grid.
- Optionally, click Files in the Select a page pane to access the Files dialog box. From here, you can restore the database to a new location by specifying a new restore destination for each file in the Restore the database files as grid.
- Further, to view or select the advanced options, on the Options page, in the Restore options panel. Then, you can select any of the following options, if appropriate for your situation.
- Lastly, click OK.
B. Restore an earlier disk backup over an existing database
The following example restores an earlier disk backup of Sales and overwrites the existing Sales database.
- Firstly, in Object Explorer, connect to an instance of the SQL Server Database Engine and then expand that instance.
- Secondly, right-click Databases and select Restore Database…
- Thirdly, on the General page, select Device under the Source section.
- Then, click the browse (…) button to open the Select backup devices dialog box. Click Add and navigate to your backup. Click OK after you have selected your disk backup file(s).
- After that, click OK to return to the General page.
- Click Options in the Select a page pane.
- Next, under the Restore options section, check Overwrite the existing database (WITH REPLACE).
- Now, under the Tail-log backup section, uncheck Take tail-log backup before restore.
- Lastly, under the Server connections section, check Close existing connections to destination database. And, Click Ok.

C. Restore an earlier disk backup with a new database name where the original database still exists
The following example restores an earlier disk backup of Sales and creates a new database called SalesTest. The original database, Sales, still exists on the server.
- Firstly, in Object Explorer, connect to an instance of the SQL Server Database Engine and then expand that instance.
- Secondly, right-click Databases and select Restore Database…
- Thirdly, on the General page, select Device under the Source section.
- Then, click the browse (…) button to open the Select backup devices dialog box. Click Add and navigate to your backup. Click OK after you have selected your disk backup file(s).
- Next, click OK to return to the General page.
- After that, in the Destination section, the Database box is automatically populated with the name of the database to be restored. To change the name of the database, enter the new name in the Database box.
- Now, click Options in the Select a page pane.
- Under the Tail-log backup section, uncheck “Take tail-log backup before restore”.
- Lastly, click OK.
D. Restore earlier disk backups to a point in time
The following example restores a database to its state as of 1:23:17 PM on May 30, 2016 and shows a restore operation that involves multiple log backups. The database does not currently exist on the server.
- Firstly, in Object Explorer, connect to an instance of the SQL Server Database Engine and then expand that instance.
- Secondly, right-click Databases and select Restore Database…
- Thirdly, on the General page, select Device under the Source section. And, click the browse (…) button to open the Select backup devices dialog box. Then, click Add and navigate to your full backup and all relevant transaction log backups. Click OK after you have selected your disk backup files.
- After that, click OK to return to the General page.
- Net, in the Destination section, click on Timeline to access the Backup Timeline dialog box to manually select a point in time to stop the recovery action.
- Select Specific date and time.
- Now, change the Timeline interval to Hour in the drop down box (optional). And, move the slider to the desired time.
- Lastly, click OK to return to the General page.
E. Restore a backup from the Microsoft Azure storage service
Common Steps
The two examples perform a restore of Sales from a backup located in the Microsoft Azure storage service. The storage Account name is mystorageaccount. The container is called myfirstcontainer. For brevity, the first six steps are listed here once and all examples will start on Step 7.
- Firstly, in Object Explorer, connect to an instance of the SQL Server Database Engine and then expand that instance.
- Secondly, right-click Databases and select Restore Database….
- Then, on the General page, select Device under the Source section.
- Now, click the browse (…) button to open the Select backup devices dialog box.
- After that, select URL from the Backup media type: drop-down list.
- Click Add and the Select a Backup File Location dialog box opens.
F. Restore local backup to Microsoft Azure storage (URL)
The Sales database will be restored to the Microsoft Azure storage container https://mystorageaccount.blob.core.windows.net/myfirstcontainer from a backup located at E:\MSSQL\BAK. The SQL Server credential for the Azure container has already been created. A SQL Server credential for the destination container must already exist as it cannot be created through the Restore task. The Sales database does not currently exist on the server.
- Firstly, in Object Explorer, connect to an instance of the SQL Server Database Engine and then expand that instance.
- Secondly, right-click Databases and select Restore Database….
- Thirdly, on the General page, select Device under the Source section. And, click the browse (…) button to open the Select backup devices dialog box.
- After that, select File from the Backup media type: drop-down list.
- Now, click Add and the Locate Backup File dialog box opens. Here, navigate to E:\MSSQL\BAK, select the backup file and then click OK.
- Next, click OK to return to the General page. And, then, click Files in the Select a page pane.
- After that, check the box Relocate all files to folder.
- Then, enter the container, https://mystorageaccount.blob.core.windows.net/myfirstcontainer, in the text boxes for Data file folder: and Log file folder:.
- Lastly, click OK.

Reference: Microsoft Documentation