Implement object-level encryption
In this tutorial, we will learn about object-level encryption and how to secure sensitive data in a database in Azure SQL Database with data encryption by using the Always Encrypted wizard in SQL Server Management Studio (SSMS).
However, Always Encrypted is a data encryption technology that helps protect sensitive data at rest on the server, during movement between client and server, and while the data is in use. Moreover, it ensures that sensitive data never appears as plaintext inside the database system. After you configure data encryption, only client applications or app servers that have access to the keys can access plaintext data.
Enable client application access
You must enable your client application to access your database in SQL Database by setting up an Azure Active Directory (Azure AD) application and copying the Application ID and key that you will need to authenticate your application.
Create a key vault to store your keys
Now that your client app is configured and you have your application ID, it’s time to create a key vault and configure its access policy so you and your application can access the vault’s secrets (the Always Encrypted keys). However, the create, get, list, sign, verify, wrapKey, and unwrapKey permissions are for creating a new column master key. And also for setting up encryption with SQL Server Management Studio.
Connect with SSMS
Open SQL Server Management Studio (SSMS) and connect to the server or managed with your database.
- Firstly, open SSMS. (Go to Connect > Database Engine to open the Connect to Server window if it isn’t open.)
- Secondly, enter your server name or instance name and credentials.
However, if the New Firewall Rule window opens, sign in to Azure and let SSMS create a new firewall rule for you.
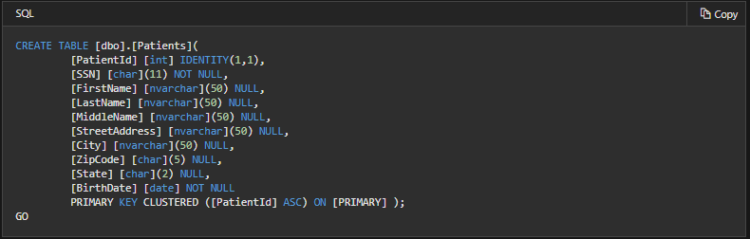
Create a table
In this section, you will create a table to hold patient data.
- Firstly, expand Databases.
- Secondly, right-click the database and click New Query.
- Lastly, paste the following Transact-SQL (T-SQL) into the new query window and Execute it.
Master Key Configuration
The Master Key Configuration page is where you set up your CMK and select the key store provider where the CMK will be stored. Currently, you can store a CMK in the Windows certificate store, Azure Key Vault, or a hardware security module (HSM).
To store your keys in Azure Key Vault.
- Firstly, select Azure Key Vault.
- Then, select the desired key vault from the drop-down list.
- After that, click Next.

Create a client application that works with the encrypted data
Now that Always Encrypted is set up, you can build an application that performs inserts and selects on the encrypted columns.
- Firstly, open Visual Studio and create a new C# Console Application (Visual Studio 2015 and earlier) or Console App (.NET Framework) (Visual Studio 2017 and later).
- Secondly, name the project AlwaysEncryptedConsoleAKVApp and click OK.
- Thirdly, install the following NuGet packages by going to Tools > NuGet Package Manager > Package Manager Console.
Now, run these two lines of code in the Package Manager Console:
PowerShell
Install-Package Microsoft.SqlServer.Management.AlwaysEncrypted.AzureKeyVaultProvider
Install-Package Microsoft.IdentityModel.Clients.ActiveDirectory
Modify your connection string to enable Always Encrypted
To enable Always Encrypted, you need to add the Column Encryption Setting keyword to your connection string and set it to Enabled. However, you can set this directly in the connection string, or you can set it by using SqlConnectionStringBuilder. The sample application in the next section shows how to use SqlConnectionStringBuilder.
Enable Always Encrypted in the connection string
Add the following keyword to your connection string.
Column Encryption Setting=Enabled
Enable Always Encrypted with SqlConnectionStringBuilder
The following code shows how to enable Always Encrypted by setting SqlConnectionStringBuilder.ColumnEncryptionSetting to Enabled.
C#
// Instantiate a SqlConnectionStringBuilder.
SqlConnectionStringBuilder connStringBuilder = new SqlConnectionStringBuilder(“replace with your connection string”);
// Enable Always Encrypted.
connStringBuilder.ColumnEncryptionSetting = SqlConnectionColumnEncryptionSetting.Enabled;
Verify that the data is encrypted
You can quickly check that the actual data on the server is encrypted by querying the Patients data with SSMS (using your current connection where Column Encryption Setting is not yet enabled).
Run the following query on the Clinic database.
SQL
SELECT FirstName, LastName, SSN, BirthDate FROM Patients;
Further, to use SSMS to access the plaintext data, you first need to ensure that the user has proper permissions to the Azure Key Vault: get, unwrapKey, and verify.
Then add the Column Encryption Setting=enabled parameter during your connection.
- Firstly, in SSMS, right-click your server in Object Explorer and choose Disconnect.
- Secondly, click Connect > Database Engine to open the Connect to Server window and click Options.
- Then, click Additional Connection Parameters and type Column Encryption Setting=enabled.
Run the following query on the Clinic database.
SQL
SELECT FirstName, LastName, SSN, BirthDate FROM Patients;

Reference: Microsoft Documentation