Implement Always Encrypted
In this article, we’ll look at how to use the Always Encrypted wizard in SQL Server Management Studio to encrypt sensitive data in an Azure SQL Database or Azure SQL Managed Instance (SSMS).
Always Encrypted is a data encryption solution that helps safeguard sensitive data while it is on the server, in transit between clients and servers, and in use, guaranteeing that sensitive data is never exposed in plaintext inside the database system. Plaintext data can only have client programs or app servers access that further have access to the keys after it encrypt.
Connect with SSMS
Connect to the server or database you’re managing with SQL Server Management Studio (SSMS).
- Firstly, open SSMS. (Click Connect > Database Engine to open the Connect to Server window if it is not open).
- Then, enter your server name and credentials.
Sign in to Azure and let SSMS build a new firewall rule for you if the New Firewall Rule box appears.
Create a table
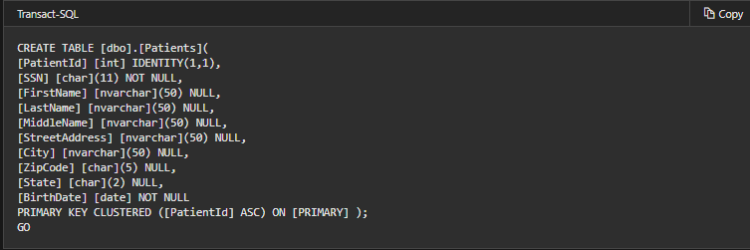
In this part, you’ll construct a table to store patient information. This will start off as a regular table, but you’ll configure encryption in the following stage.
- Firstly, expand Databases.
- Secondly, right-click the Clinic database and click New Query.
- Then, paste the following Transact-SQL (T-SQL) into the new query window and Execute it.

Encrypt columns (configure Always Encrypted)
Always Encrypted is simply configured with SSMS’ wizard, which sets up the CMK, CEK, and encrypted columns for you.
- Firstly, expand Databases > Clinic > Tables.
- Then, right-click the Patients table and select Encrypt Columns to open the Always Encrypted wizard:
The Always Encrypted wizard includes the following sections: Column Selection, Master Key Configuration (CMK), Validation, and Summary.
Create a client application that works with the encrypted data
After you’ve set up Always Encrypted, you may create an application that inserts and selects data from the encrypted columns. However, you must execute the example program on the same computer that you used to perform the Always Encrypted wizard. You must also deploy your Always Encrypted certificates to the machine running the client software in order to execute it on another computer.
- Firstly, open Visual Studio and create a new C# console application. Make sure your project is set to .NET Framework 4.6 or later.
- Secondly, name the project AlwaysEncryptedConsoleApp and click OK.
Enable Always Encrypted in the connection string
Add the following keyword to your connection string:
Column Encryption Setting=Enabled
Enable Always Encrypted with a SqlConnectionStringBuilder
The following code shows how to enable Always Encrypted by setting the SqlConnectionStringBuilder.ColumnEncryptionSetting to Enabled.
C#
// Instantiate a SqlConnectionStringBuilder.
SqlConnectionStringBuilder connStringBuilder =
new SqlConnectionStringBuilder(“replace with your connection string”);
// Enable Always Encrypted.
connStringBuilder.ColumnEncryptionSetting =
SqlConnectionColumnEncryptionSetting.Enabled;
Verify that the data is encrypted
By querying the Patient’s data using SSMS, you can easily verify that the real data on the server is encrypted.
Run the following query on the Clinic database.
Transact-SQL
SELECT FirstName, LastName, SSN, BirthDate FROM Patients;
However, to use SSMS to access the plaintext data, you can add the Column Encryption Setting=enabled parameter to the connection.
- Firstly, in SSMS, right-click your server in Object Explorer, and then click Disconnect.
- Secondly, click Connect > Database Engine to open the Connect to Server window, and then click Options.
- Then, click Additional Connection Parameters and type Column Encryption Setting=enabled.
Run the following query on the Clinic database.
Transact-SQL
SELECT FirstName, LastName, SSN, BirthDate FROM Patients;
Reference: Microsoft Documentation


